Setting Up A High-Availability Load Balancer With HAProxy/Keepalived On Debian Lenny - Page 2
https://www.howtoforge.com/setting-up-a-high-availability-load-balancer-with-haproxy-keepalived-on-debian-lenny-p2
yum install psmisc (for killall)
=======================================================
Setting Up A High-Availability Load Balancer With HAProxy/Keepalived On Debian Lenny - Page 2
5 Setting Up keepalived
We've just configured HAProxy to listen on the virtual IP address 192.168.0.99, but someone has to tell lb1 and lb2 that they should listen on that IP address. This is done by keepalived which we install like this:
lb1/lb2:
aptitude install keepalived
To allow HAProxy to bind to the shared IP address, we add the following line to /etc/sysctl.conf:
vi /etc/sysctl.conf
[...] net.ipv4.ip_nonlocal_bind=1 |
sysctl -p
Next we must configure keepalived (this is done through the configuration file /etc/keepalived/keepalived.conf). I want lb1 to be the active (or master) load balancer, so we use this configuration on lb1:
lb1:
vi /etc/keepalived/keepalived.conf
vrrp_script chk_haproxy {           # Requires keepalived-1.1.13
        script "killall -0 haproxy"     # cheaper than pidof
        interval 2                      # check every 2 seconds
        weight 2                        # add 2 points of prio if OK
}

vrrp_instance VI_1 {
        interface eth0
        state MASTER
        virtual_router_id 51
        priority 101                    # 101 on master, 100 on backup
        virtual_ipaddress {
            192.168.0.99
        }
        track_script {
            chk_haproxy
        }
}
|
(It is important that you use priority 101 in the above file - this makes lb1 the master!)
Then we start keepalived on lb1:
lb1:
/etc/init.d/keepalived start
Then run:
lb1:
ip addr sh eth0
... and you should find that lb1 is now listening on the shared IP address, too:
lb1:~# ip addr sh eth0
2: eth0: <BROADCAST,MULTICAST,UP,LOWER_UP> mtu 1500 qdisc pfifo_fast state UNKNOWN qlen 1000
link/ether 00:0c:29:63:f7:5c brd ff:ff:ff:ff:ff:ff
inet 192.168.0.100/24 brd 192.168.0.255 scope global eth0
inet 192.168.0.99/32 scope global eth0
inet6 fe80::20c:29ff:fe63:f75c/64 scope link
valid_lft forever preferred_lft forever
lb1:~#
Now we do almost the same on lb2. There's one small, but important difference - we use priority 100 instead of priority 101 in /etc/keepalived/keepalived.conf which makes lb2 the passive (slave or hot-standby) load balancer:2: eth0: <BROADCAST,MULTICAST,UP,LOWER_UP> mtu 1500 qdisc pfifo_fast state UNKNOWN qlen 1000
link/ether 00:0c:29:63:f7:5c brd ff:ff:ff:ff:ff:ff
inet 192.168.0.100/24 brd 192.168.0.255 scope global eth0
inet 192.168.0.99/32 scope global eth0
inet6 fe80::20c:29ff:fe63:f75c/64 scope link
valid_lft forever preferred_lft forever
lb1:~#
lb2:
vi /etc/keepalived/keepalived.conf
vrrp_script chk_haproxy {           # Requires keepalived-1.1.13
        script "killall -0 haproxy"     # cheaper than pidof
        interval 2                      # check every 2 seconds
        weight 2                        # add 2 points of prio if OK
}

vrrp_instance VI_1 {
        interface eth0
        state MASTER
        virtual_router_id 51
        priority 100                    # 101 on master, 100 on backup
        virtual_ipaddress {
            192.168.0.99
        }
        track_script {
            chk_haproxy
        }
}
|
lb2:
/etc/init.d/keepalived start
As lb2 is the passive load balancer, it should not be listening on the virtual IP address as long as lb1 is up. We can check that with:
lb2:
ip addr sh eth0
The output should look like this:
lb2:~# ip addr sh eth0
2: eth0: <BROADCAST,MULTICAST,UP,LOWER_UP> mtu 1500 qdisc pfifo_fast state UNKNOWN qlen 1000
link/ether 00:0c:29:be:7b:3b brd ff:ff:ff:ff:ff:ff
inet 192.168.0.101/24 brd 192.168.0.255 scope global eth0
inet6 fe80::20c:29ff:febe:7b3b/64 scope link
valid_lft forever preferred_lft forever
lb2:~#
2: eth0: <BROADCAST,MULTICAST,UP,LOWER_UP> mtu 1500 qdisc pfifo_fast state UNKNOWN qlen 1000
link/ether 00:0c:29:be:7b:3b brd ff:ff:ff:ff:ff:ff
inet 192.168.0.101/24 brd 192.168.0.255 scope global eth0
inet6 fe80::20c:29ff:febe:7b3b/64 scope link
valid_lft forever preferred_lft forever
lb2:~#
6 Starting HAProxy
Now we can start HAProxy:
lb1/lb2:
/etc/init.d/haproxy start
7 Testing
Our high-availability load balancer is now up and running.You can now make HTTP requests to the virtual IP address 192.168.0.99 (or to any domain/hostname that is pointing to the virtual IP address), and you should get content from the backend web servers.
You can test its high-availability/failover capabilities by switching off one backend web server - the load balancer should then redirect all requests to the remaining backend web server. Afterwards, switch off the active load balancer (lb1) - lb2 should take over immediately. You can check that by running:
lb2:
ip addr sh eth0
You should now see the virtual IP address in the output on lb2:
lb2:~# ip addr sh eth0
2: eth0: <BROADCAST,MULTICAST,UP,LOWER_UP> mtu 1500 qdisc pfifo_fast state UNKNOWN qlen 1000
link/ether 00:0c:29:be:7b:3b brd ff:ff:ff:ff:ff:ff
inet 192.168.0.101/24 brd 192.168.0.255 scope global eth0
inet 192.168.0.99/32 scope global eth0
inet6 fe80::20c:29ff:febe:7b3b/64 scope link
valid_lft forever preferred_lft forever
lb2:~#
When lb1 comes up again, it will take over the master role again. 2: eth0: <BROADCAST,MULTICAST,UP,LOWER_UP> mtu 1500 qdisc pfifo_fast state UNKNOWN qlen 1000
link/ether 00:0c:29:be:7b:3b brd ff:ff:ff:ff:ff:ff
inet 192.168.0.101/24 brd 192.168.0.255 scope global eth0
inet 192.168.0.99/32 scope global eth0
inet6 fe80::20c:29ff:febe:7b3b/64 scope link
valid_lft forever preferred_lft forever
lb2:~#
8 HAProxy Statistics
You might have noticed that we have used the options stats enable and stats auth someuser:somepassword in the HAProxy configuration in chapter 4. This allow us to access (password-protected) HAProxy statistics under the URL http://192.168.0.99/haproxy?stats. This is how it looks: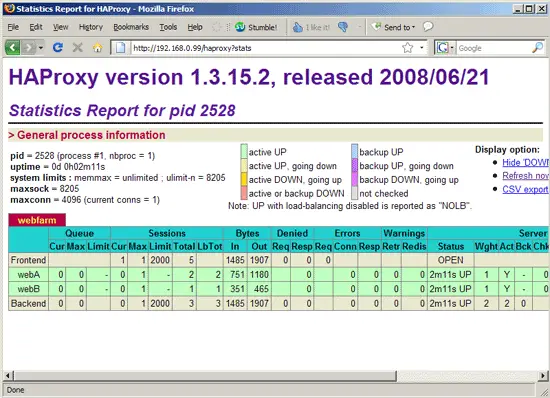
If you don't need the statistics, just comment out or remove the stats lines from the HAProxy configuration.
No comments:
Post a Comment