http://start.spring.io/ web , download and unzip
intellij
"import project" as maven
create resource folder under src-main=java-com.----
create java file (Hello) aind write
@RestController
@RequestMapping("/rest/docker/hello")
public class Hello {
@GetMapping
public String hello () {
return "Hello Hasaranga";
}
}
https://www.youtube.com/watch?v=FlSup_eelYE
add Dockerfile (file) into main folder
clean and compile, copy project to centos
( https://drive.google.com/file/d/1r4-_UFJBYBAb4bVyXFPmGuL_ZzJY2zQI/view?usp=sharing )
216 cd /root/Downloads/hasa/docker-spb/
217 docker build -f Dockerfile -t docker-spring-boot .
218 docker run -p 8085:8085 docker-spring-boot
247 docker login hasaranga.azurecr.io
224 docker images
249 docker tag docker-spring-boot hasaranga.azurecr.io/docker-spring-boot
250 docker push hasaranga.azurecr.io/docker-spring-boot


==================
Docker with AWS, 3 ways
- Deploying Docker containers directly from an Ec2 instance.
- Using Docker containers on Elastic Beanstalk.
- Docker cluster management using the AWS EC2 Container Service.
https://cloudacademy.com/blog/amazon-ec2-container-service-docker-aws/
Below shows 2nd option:


same Docker file and target/**.jar zip to a file
then create Elastic beanstalk app and upload the zip file (must contain Docker file and target/---.jar )
then its same as above in Azure. Difference is no need to build the image locally. only upload the Docker file and jar
its easy
Elastic Beanstalk = Code uploading only
==============
==============================
Sprinboot and Mysql standalone
==============================
====ex: 01====
Ref:
https://www.youtube.com/watch?v=fvEWoy1xOvo&t=780s
https://github.com/TechPrimers/docker-mysql-spring-boot-example
Steps:
1. run SQL as a container
docker run --name mysql-standalone -e MYSQL_ROOT_PASSWORD=password -e MYSQL_DATABASE=test -e MYSQL_USER=sa -e MYSQL_PASSWORD=password -d mysql:5.6
2. Download APP(compiled) and run.
download : https://drive.google.com/open?id=1B2ZPNi-1MqU9LDEJupWyRffCTuvBwikI
docker run -p 8086:8086 --name users-mysql --link mysql-standalone:mysql -d users-mysql
3. To test:
http://localhost:8086/all/ --> show current data
http://localhost:8086/all/create --> creating a user (hard coded)
http://localhost:8086/all/ --> show current data
====ex: 02====
Summary : create app on ELB with RDS connection
Steps:
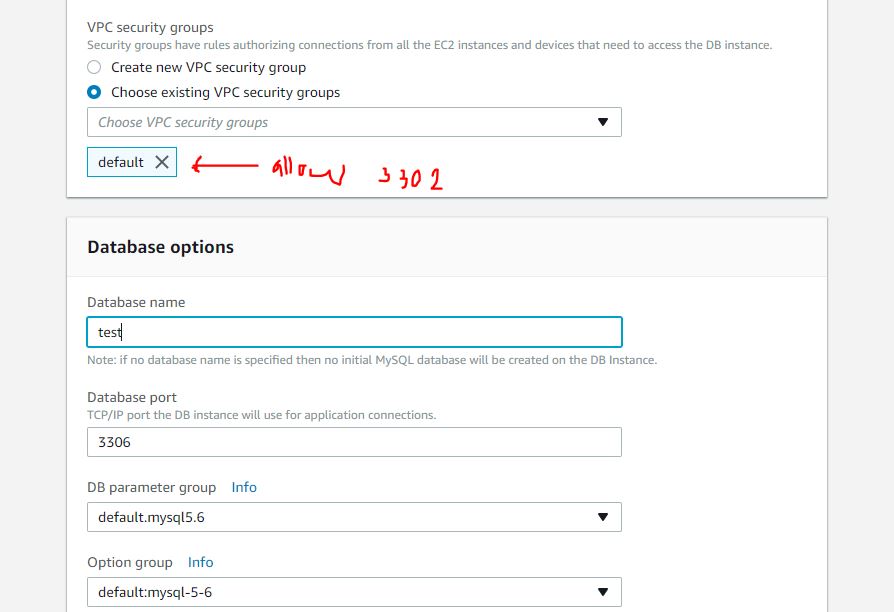
1. create RDS (Mysql) and allow port from sec. group.
ex: test.ciijyquabkzc.us-west-2.rds.amazonaws.com port=3306

2. test :
install mysql (yum install mysql)
telnet test.ciijyquabkzc.us-west-2.rds.amazonaws.com 3306
connect : mysql --host=test.ciijyquabkzc.us-west-2.rds.amazonaws.com --port=3306 --user=sa --password=password --database=test
3. clean, compile and deploy using intelij. (already compiled)
[ modified application properties as : spring.datasource.url = jdbc:mysql://test.ciijyquabkzc.us-west-2.rds.amazonaws.com:3306/test ]
https://drive.google.com/open?id=1kSGo12IDLehNDs2G6-v1ioMbir3UBXNK
4. extract and test it internally.
docker build . -t users-mysql
docker run -p 8086:8086 --name users-mysql -d users-mysql
http://127.0.0.1:8086/all/ , http://127.0.0.1:8086/all/create
5) Test same on AWS Beanstalk
(only need to zip target and Docker file)
Already ziped : https://drive.google.com/open?id=10qmeHuOZHge7iQdf_6Gdoy1WRcsSMJHT
create EL Beanstalk app with sample code and upload above zip after that.


then access : http://first-env.vhfijapptj.us-west-2.elasticbeanstalk.com/all/, http://first-env.vhfijapptj.us-west-2.elasticbeanstalk.com/all/create
6. Update software configs via ELB
Name: spring.datasource.password value: passwordName: spring.datasource.url value: jdbc:mysql://testdb.ciijyquabkzc.us-west-2.rds.amazonaws.com:3306/test
This will overwrite existing application.config file.
--------
full project https://drive.google.com/open?id=1crNkXHUDgzom2ummXGztFXxyHRa4oYXR
--------
Super! thanks for your information keep updating AWS Online Training
ReplyDelete